Wednesday 31 December 2014

Happy New Year!!

Hello, my sweet friends!

I want to wish you all a Very Happy New Year!
Isn't it exciting to start a brand new year?
There is lots of goodness ahead for all of us! :o)

The project I have to share with you today has nothing to do with the occasion.
It's just a sampling of the fun that I plan to continue with in 2015.

Along with the rubber All Dressed Up stamp I received from Sugar Nellie,
I was gifted with this great image called "Alice".
You can find it at Funky Kits right HERE.

As I was colouring her up with my markers, the sentiment came to mind.
I thought it was a really fun play on words...you know...
with it being Alice in WONDERland and all! ;o)

So if you want to pop over to Funky Kits and get this stamp,
you can come back here and find the sentiment on my "Free Stuff" page.


Materials Used:
Papers: Recollections - Cardstock;
Stamp: Sugar Nellie - Alice;
Ink: Memento - Tuxedo Black;
Spectrum Noir Markers;
Die: Cheery Lynn - English Tea Party;
Punch: EK Success Mini Corner Punch - Sentiment 2;
Baker's Twine: WRMK - Sew Easy;
Pearls: Kaisercraft;
Sentiment: The Nickel Nook.

* * * * *
Linking Up To:


* * * * *
Again, Happy New Year to you all!

I hope that 2015 is FULL of WONDER!! :o)


Tuesday 23 December 2014

Merry Christmas! (and Ephemera's Vintage Garden - Old Saint Nick - Project #3)

Merry Christmas, my friends!

This is my third and final project using the Old Saint Nick collection from Ephemera's Vintage Garden .
 You can find the collection right HERE.

I have made it as my "Merry Christmas" card to each of you! 
I had such good intentions of mailing out cards to many of you this year but it just didn't happen!

It's been a different kind of year for me, as I'm still dealing with the loss of my Mom.
I have found myself much more focused on the true meaning of Christmas...without all of the trappings.
It's a time to celebrate the birth of my Lord Jesus, 
and to create special memories with my family.

I wish the same for each one of you!
May you have a very Blessed Christmas as you enjoy your own celebrations!


Materials Used:
Ephemera's Vintage Garden Printable Kit - Old Saint Nick;
Burlap Wrapped Canvas - 9 X 12;
Glitter Snow Mixed with Gold Glitter;
Cricut Cartridge: December 25th;
Die: Tim Holtz Alterations - Tattered Poinsettias;
Ink: Distress Inks - Walnut Stain, Pine Needles, Aged Mahogany;
Smooch Accent Ink - Gold;
Liquid Pearls - Buttercup;
Unknown Ribbons.

 * * * * *
If you have any questions about how I put this together, please ask!

When you're in the mood to do some after Christmas shopping, 
head over to Ephemera's Vintage Garden and take a look at all the fabulous kits available.

Oh, and don't forget to go to Debbie's blog HERE to sign up for her newsletter. 
Debbie is very generous with her gorgeous freebies! :o)

Wednesday 17 December 2014

Feed the Birds!

Hello, my friends!

Happy day to you all!
Can you believe its only a week until Christmas Eve?
I've been busy doing non-crafty jobs in preparation!

Today I took a break from all that and did some playing!
 I have a new card to share with you, and it's not even a Christmas card!

I used a fabulous new All Dressed Up image for Sugar Nellie.
This one is called "Feed the Birds" and it's available right HERE at Funky Kits!

Those of you that come by often know how I feel about birds.
I bet you can tell how much fun I had making this card too.
I used some fabulous new toys to show off this wonderful image.
Don't you just love early Christmas gifts? :o)

I started with stamping the cloud background stamp with blue ink.
Next, I embossed the trees and birds stamp in black.
The sweet image is coloured with my Spectrum Noirs and popped up.
Finally, I created the card base using my fun Birds on a Wire die across the top.
Oh, I also used my new "Hello" die!


Materials Used:
Papers: Recollections - Cardstock;
Image: All Dressed Up - Feed the Birds,
Spectrum Noir Markers;
Stamps: Impression Obsession Cover-a-Card - Clouds, Birds on Trees;
Dies: Impression Obsession - Greeting Set,
Die-namites - Birds on a Wire;
Ink: Distress Ink - Black Soot, Salty Ocean;
Embossing Powder: Stamp-n-Stuff - Detail Black.

* * * * *
Linking Up To:


* * * * *

EnJOY the rest of your week!
See you again very soon! :o)


Sunday 7 December 2014

All Dressed Up - New Release

Hello, my friends!

Welcome to the All Dressed Up New Release for December!

Also, a BIG welcome to all of my new friends! :o)

I have something fun to share with you today.
Wendy has got some fabulous new rubber stamps available for sale. 
You can find them all at Funky Kits.

I used this sweet stamp called "Love My Kitty" and it stamped beautifully! 
I coloured it with my Spectrum Noir markers, backed it with some layers, and added bling and flowers. 


Materials Used:
Papers: Recollections - Cardstock, Crate Paper - 
Image: All Dressed Up - Love My Kitty,
Spectrum Noir Markers;
Punch: WRMK Mini 8 Punch - Doily, Corner Chomper - Scallop;
Flowers: Gift from Joy;
Unknown Bling

* * * * *
There's been LOTS of excitement and changes taking place over at All Dressed Up!
Besides the release of several gorgeous rubber stamps, 
two new digital images have been released. 
Check out the rubber stamps at Funky Kits,
the digital stamps at All Dressed Up Etsy Shop,
and then stop over and join the Facebook page.
There will be some fun new challenges going on there very soon!

Happy Day to you all! :o)


Tuesday 2 December 2014

The Stockings Were Hung...

Hello, my sweet friends!

I have a new project to share with you today! 
I have recently stepped down from a couple of my DTs and now I have some time for some extra fun.

I used this adorable image from StampArt Design by Kathryne.
It's called "Paddy's Christmas", and you can find it at Whimsy Stamps right HERE.

I started with this fun Shelf and Frames die that I've had for a while but not used.
You can't even see the shelf now because of all the greenery I added.
I guess that's how it actually goes when decorating for Christmas! ;o)
I filled the frames with my smallest Christmas stamps,
and then hung the stocking.
Finally, I added stickles to several areas and glossy accents on the candy cane.

This is a page to add to my December Daily.
It will fit in beautifully with the pages documenting our Christmas stockings. 


Materials Used:
Papers: Hot Off The Press;
Imag: StampArt Design by Kathryne - Paddy's Christmas;
Spectrum Noir Markers;
Dies: Quickutz - Frames and Shelf,
Tim Holtz Festive Greenery Decorative Strip;
Stamps: Gina K, Stampin' Up;
Ink: Memento - Tuxedo Black;
Stencil: Fiskars Oval;
Stickles: Diamond, Candy Cane;
Glossy Accents;
Unknown Rhinestones.

* * * * *
Linking Up To:


* * * * *

Thanks so much for stopping by!
Hope your day is full of joy! :o)


Sunday 30 November 2014

Ephemera's Vintage Garden - Old Saint Nick - Project #2

Hello, my friends!

Can you believe that it's the last day of November?

With that in mind, I'm back already to share with you my second project 
using the Old Saint Nick collection from Ephemera's Vintage Garden .
 You can find the collection right HERE.

I started with a wooden framed mirror from Ikea. 
I covered the mirror and stained all the wood with Distress Stain. 
I printed out the page of numbers, and then punched them all out using a 1" circle punch. 
Then I printed out a page of ephemera and chose the cards I wanted to use. 
I inked the edges of all the paper bits.
Then I matted the numbers with a combination of 1 1/4" circles 
and punched square postage stamp.
I took a doily from my stash and cut it in half. 
I adhered half on each side of the mirror.
Then I lay everything out where I wanted it and glued it down.
The only thing left to do was add a scattering of glittery bits: 
sequins, pearls, rhinestones, and the poinsettia. 

For the "Christmas Countdown", I cut a piece of chalkboard paper to fit over the mirror. 
Then I die-cut the words and glued them on.
I didn't add a number because I couldn't find any chalk! lol
It was a super fun project to put together, and a great one to get the kids in on! 


Materials Used:
Ephemera's Vintage Garden Printable Kit - Old Saint Nick;
Papers: Recollections - Cardstock;
Stain: Distress Stain - Weathered Wood;
Inks: Distress Inks - Walnut Stain, Iced Spruce;
Die: Sizzix Decorative Strip - Wingo Zingo;
Flower: Prima - Poinsettia;
My Stash: Sequins, Pearls, Rhinestones & Doily.

* * * * *


I'll be back again very soon to show you my third and final project using this great kit!

In the meantime, head over to Ephemera's Vintage Garden and take a look at all the fabulous kits available.

Oh, and don't forget to go to Debbie's blog HERE to sign up for her newsletter. 
Debbie is very generous with her gorgeous freebies! :o)


Wednesday 26 November 2014

Ephemera's Vintage Garden - Old St. Nick - Project #1

Happy Wednesday, my friends!

WooHoo for Winter!
We've had our first blizzard of the year and everything is covered with a beautiful blanket of snow!
I am now in hibernation mode...and loving it! :o)

Oh, and a very Happy and Blessed Thanksgiving to all of my American friends!
I'm celebrating right along with you...sans turkey! 

I have another beautiful kit from Ephemera's Vintage Garden to share with you.
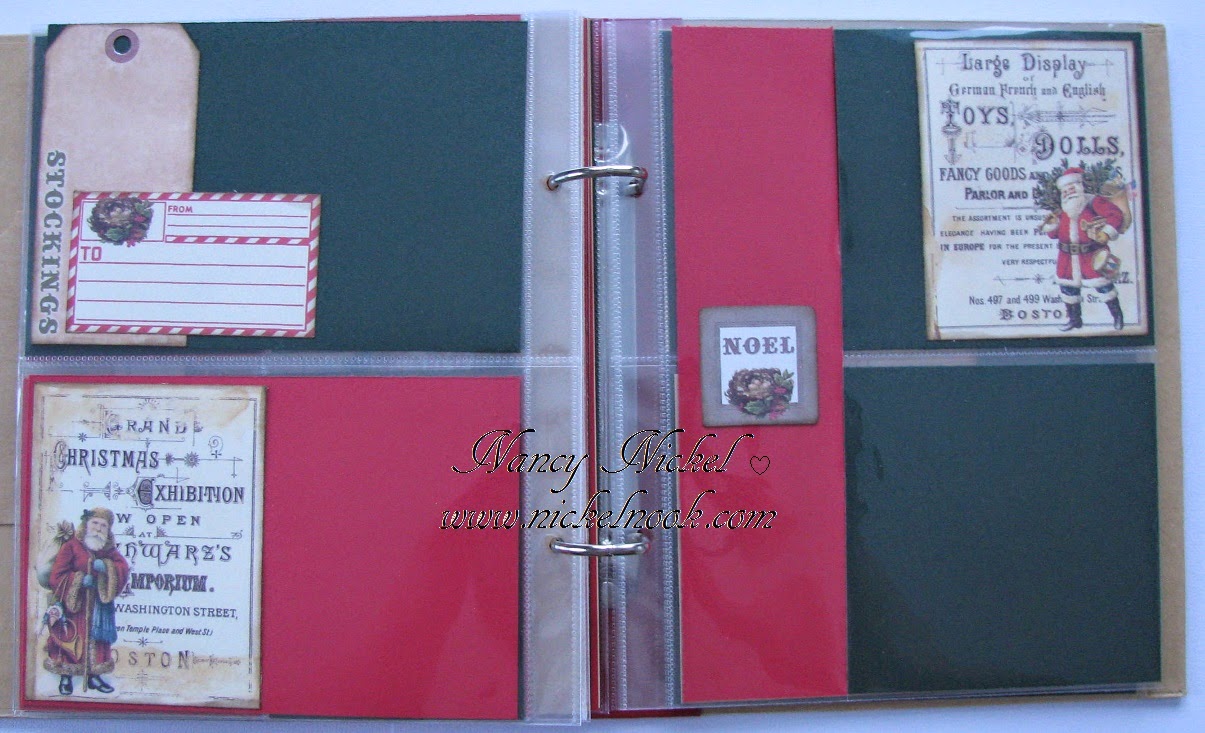
This one is called Old Saint Nick. 
I have used both the printable journal kit and the ephemera pack found HERE

For a while now I have been interested in putting together a December Daily. 
My only concern has been what I would possibly fill it with.
 With the kids gone, and it being just my sweetie and me, there's not a whole lot going on every day. 
However, when I saw this kit I knew I had to put one together. 
Of course, Christmas for me is all about celebrating the birth of my Savior, Jesus Christ.
Santa doesn't come into it except as a decorative accent. 
This kit is really beautiful though, and I'll be filling my album with Scripture verses 
and songs that show the true meaning of the season! :o)

I have lots of photos to share with you, so I'll keep the descriptions to a minimum. 
Other than the printables, I used only plain cardstock in green, red, and light kraft.
The album is a My Mind's Eye - Lost & Found Record It Heirloom Snap Album. 
I have combined the pocket pages with full cardstock pages. 
There is lots of room to add more of whatever I want.
Obviously it's not finished yet but it's all ready to begin filling on December 1st. 
The printable bits are adhered on the edges or corners, 
so that photos can be slipped under them.
Not shown are the numbers 1 through 31, which I will be adding in the appropriate places. 
A binder album like this is perfect because I can move the pages around if I need to. 

I have not decorated the cover yet other than to add this picture in the frame.


On the left, I cut out the center of this printable to form a frame. 
Since the song on the right is called "The Christmas Tree" it will be a great place to add a photo of my tree. 
I printed out an extra music sheet page and cut out my new tree die. 
I then inked it up and layered it on dimensionals.
Here's a closer look at that:


I've scattered the printable tags through out the album.
They give me a guideline of what I want to record where.
This one with "Santa" could be a good place to record what Santa brings me this year! ;o)


I saved the last full-size pocket page for a large "Christmas Morning" photo.
I tucked the coffee card in behind the tag as I'm sure it will play a part in my Christmas morning!


Materials Used:
Ephemera's Vintage Garden - Old Saint Nick Collection;
Papers: Recollections - Cardstock;
Die: Whimsy Stamps - Tall Timber Die;
Border Punches: EK Success - Scalloped Scallop, Arrow,
Unknown Fiskars Holly Punch;
Doilies, Ribbon, Baker's Twine, Brad: My Stash.

* * * * *
There you have it...my first December Daily!
I really hope to fill it up.
If I do, I'll post it again all loaded up!

In the meantime, please head over to Ephemera's Vintage Garden to pick up the Old Saint Nick Printable Kit!
Print it and cut it out!

I'm going to be back very soon to share more quick and fun projects using this same kit!

Please leave a comment if you have any questions,
or just to tell me what you think!

* * * * *
Oh, and don't forget to go to Debbie's blog HERE to sign up for her newsletter. 
Debbie is very generous with her gorgeous freebies! :o)

Tuesday 18 November 2014

Enjoy Life's Simple Moments

Hello, my friends!

Today I'm just playing!
I recently won some fun Milk Coffee images. 
I couldn't wait to colour this one up!
Isn't it fun?

The image is coloured with my Spectrum Noir markers.
I used my new Tile Works die for the background. 
I've embossed it and think it works really well with the brick wall.
I came up with a really great way to add the seam binding bow. 
Then I covered it up with the sentiment, and now you can't see it! :o)


Materials Used:
Papers: Recollections - Cardstock;
Image: Milk Coffee - Tiffany Reading Book,
Spectrum Noir Markers;
Dies: Spellbinders - Scalloped Circles (LG), Tile Works;
Punch: EK Success - Circle Punch;
Sentiment: Just Right Cling Stamp - Signs of Life;
Ink: Memento - Tuxedo Black;
Seam Binding: My Stash.

* * * * *
Linking Up With:


* * * * *

Thanks so much for stopping by!
It's always lovely to hear from you! :o)


Saturday 15 November 2014

All Dressed Up Challenge - Anything Goes

Hello, my friends!

First of all, I want to thank all of you for your sweet words 
and encouragement about my mini album and the kits I had available. 
Would you believe there is only one left?
I hope to put some more together soon!

* * * * *
Okay, now on to business...

Today is the start of a new challenge at All Dressed Up!
The challenges are always "Anything Goes" but you must use an All Dressed Up image.

For my card I used another one of the November new release images. 
This one is called "Butterfly Kisses Girl" and you can find it HERE.

Isn't she lovely? I really like her knit hat and scarf!
I coloured her, and then layered her up.
I used a pretty butterfly doily die to embellish.
Finally, I made a seam binding bow to look like a butterfly.


Materials Used:
Papers: K & Company - Watercolor Bouquet, Recollections - Cardstock;
Image: All Dressed Up - Butterfly Kisses Girl,
Spectrum Noir Markers;
Die: DieVersions - Spring Has Sprung; 
Punch: EK Success - Circle Punch;
Stamp: Whimsy - Gift from M;
Ink: CTMH - Moonstruck;
My Stash: Seam Binding, Pearls.

* * * * *

All of Wendy's fabulous images are available in her etsy shop HERE.

Head on over to All Dressed up blog to check out the rest of the teams creations, 
and why not enter the challenge while you are there.


 **Please note** 

To enter our challenges you MUST use an All Dressed Up Image or paper.

Don't forget to stop by our Facebook Group to keep up to date with all the latest All Dressed Up news, 
and to chat with fellow crafters. 

Friday 7 November 2014

All Dressed Up - November New Image Inspiration and DT Call

Hello, my friends! 

It's the 7th of the month, which means it's time for a new release at All Dressed Up! Woohoo!

However, before we get to that, there is another little bit of news:

The Dressy Girls are looking for a few more members to join our fabulously friendly team.
 You will be required to post two project per month onto our DT blog.  
One project with our newly released images  and one for a challenge.  
As well as this, you will be required to comment on your given numbers for any entrants into our Dressy challenges 
and be an active member of our Facebook Group.
In return, you will receive a fantastic digi starter pack, and of course all of the new releases each month.
The term will run from beginning of  January until the end of March 2015.
Sound like something that would interest you?
If so, then make a card and add it to Mr Linky at the end of this post.  
It doesn't need to be an All Dressed Up image but we'd love to see you use one if you can.
The call will run until November 31st and our new team will be announced the first week of December.


Okay, now onto the new release!
There are four fabulous new images:


You can find these images, as well as all the others, at the All Dressed Up Shop HERE.
Here's the card I made using the adorable "Love My Teddy" image.


Materials Used:
Papers: Recollections - Cardstock, K & Company - Watercolor Bouquet;
Image: All Dressed Up - Love My Teddy,
Spectrum Noir Markers;
Dies: Spellbinders - Standard Circles (LG), Scalloped Circles (LG);
Punch: Martha Stewart Corner Punch - Flower Shower;
Ribbon: Offray;
Bling: Unknown.

* * * * *

Don't forget our challenges are now always ANYTHING GOES, 
so why not treat yourself and play along with us for a chance of winning 3 images of your choice !


Also, don't forget to stop by our Facebook Group to share your All Dressed Up creations, 
chat with the DT girls, and keep up to date with everything All Dressed Up.
Happy Crafting
The Dressy Girls

Blog Archive