Saturday 31 December 2016

Gecko Galz - Tag You're It!

Hello, my friends!

Welcome back to another "Tag You're It" post for Gecko Galz!
Did you know that Gecko Galz has given away a prize every day in December? 
Yes...and today is the final day!
All you have to do is go to the Gecko Galz blog and leave a comment, after leaving  comment here!

Here's my tag for today,
and with it...I wish you a Very Happy New Year! :)

* * * * *
I began by creating the tag base.
I used the Cabinet Card die to create to shape the top.
The green background paper is the Evergreen page from the Christmas Past Papers.
I used the mini Cabinet Card die on the Figgy Pudding page from the same collection.
Doesn't it look like  a pretty ornament?


The beautiful New Year image is from Ring In the New Year 1 collage sheet
from the Winter release.
It's matted with a piece of the Noel page from the Christmas Past Papers.


I created the poinsettia out of the same Noel page.
The holly die and the bits behind the poinsettia were made from the rest of the Figgy Pudding page.


I tied a pretty red seam binding bow through the top of the tag.


Here's a final look at my finished tag:


Other Materials Used:
Papers: Recollections - Cardstock;
Dies: Spellbinders - Poinsettia, Memory Box - Holly Branch,
Tim Holtz Alterations - Vintage Cabinet Card Die (regular and mini);
Punch: Martha Stewart - Branch, Fiskars - Holly Bordser;
Ink: Distress Ink - Walnut Stain;
My Sewing Room - Seam Binding.

* * * * *
I hope you like my tag today!

Make sure you head over to Gecko Galz!
You don't want to miss any of the fun! :o)

Wednesday 28 December 2016

Denise's *Happy Birthday* Blog Hop & Stamp Giveaway!

Hello, my friends!

Today, The Project Bin's design team is celebrating the birthday of Denise, 
owner and designer of The Project Bin stamps! 
In honor of Denise's birthday, her design team is hosting a blog hop to showcase her wonderful stamps!
If you just stumbled upon the hop, you'll want to start at the beginning with Angela's amazing blog (add the hper link) and finish with The Project Bin blog.
There you can wish Denise a very Happy Birthday!  

For the full blog hop line up, see the list below ↓
And since it's a celebration, we have party gifts! 
One lucky winner will win a prize package, including a brand new The Project Bin stamp set. 
It is hidden on one of the stops on the hop! 

If you haven't seen the stamps at The Project Bin, there is truly something for everyone! 
Whether it's sweet and inspiring, or whimsical and fun, 
The Project Bin has it all - perfect for all your card making needs. 
In order to win the blog candy giveaway, make sure to stop at each blog on the hop and leave a comment. 
Then, head over to The Project Bin blog and leave Denise some birthday love! 
The hop will end at midnight on December 31st,
and the winner will be chosen on January 1, 2017.

For my card today, I've used a stamp from the wonderful "Fun is Good" stamp set, 
which you can find right HERE.


Materials Used:
Papers: MME - Hip Hooray "Girl" Collection;
Stamp: The Project Bin - Fun Is Good;
Ink: Stampin' Up - Tempting Turquoise;
Die: Spellbinders Nestabilities - Majestic Labels Twenty-Five,
Your Next Stamp - Stacked Cupcake Die;
Glitter Glue: Turquoise and Clear;
Ribbon: Offray;
Pearls: Crafts.

* * * * *
Next up, head on over to Patricia's blog and see her special card for Denise.

Here is the full hop order:
Cheryl Walker 
You are here>>>Nancy Nickel<<<You are here

Thanks so much for hopping along with us today! 
Don't forget to stop by The Project Bin blog and wish Denise a 
Very Happy Birthday! :o)

Sunday 25 December 2016

Tutti Designs - Deer Family Tree

Hello, my friends!

It's Monday, and I'm back with a new Tutti Designs share!

Today I am using the wonderful "Deer Family Tree" die,
which you can find right HERE.

Christmas is over but as you can see this isn't really a Christmas tree.
It's perfect for a masculine Winter card!

I began with a black cardstock base.
I cut the deer designer paper to size, and die-cut the tree from the center.
Then I die-cut another tree from green cardstock.
I simply adhered the green tree into the die-cut opening.
The black behind the green displays all the detail beautifully!


To finish it off, I simply added a few green sequins,
and a green cord bow.


It would be lovely for any man having a Winter birthday!


Other Materials Used:
Papers: Bazzill - Cardstock, Basic Grey - Jovial;
Cord: Hemptique Crafter's Cord - Green;
Bling: Dollarama Sequins - Green.


Tutti Designs Die - Deer Family Tree


* * * * *
I'll be back next week with a new project.
In the meantime, here are all the links you'll need:


Thursday 22 December 2016

For Those Last Minute Gifts

Hello, my friends! 

I'm back with a new project made with products from the Cards and More Shop .

Today I want to share a last minute gift idea,
it's also a great way to use up some of your favorite scraps.

Over this past year I have shared numerous projects 
using the wonderful Maja Design Vintage Frost papers.
I am down to the smallest scraps but am finding ways to use them up.

This project would be lovely for those last minute gifts.
Sometimes you just don't know what to get for some people.
That is usually when you resort to buying gift cards.
These little decorative bags would be ideal packaging for these cards.
I made my bag using the Tim Holtz In the Bag die but there are many other options available.

You can even make one yourself!
These particular bags measure 3" x 4" x 3/4".

Here they are...one for him and one for her:


Here's the one for her.
I used a scrap of the pretty paper, keeping the branding strip along the bottom.
I tool and ink distressed the edges, and adhered it to the bag.
I added a pretty trim across the top.
Then I fussy cut the little angel embellishment out,
inked the edges, and adhered it in place.


Here's the one for him.
Again, I chose a paper, and tool and ink distressed the edges.
I wrapped some twine around it and tied a bow.
I fussy cut the sweet Santa embellishment, inked the edges,
and adhered it in place.


Here are some close-up photos:


One final look.
I kept the backs of the bags plain so that a message can be added.


These were the products used from the Cards and More Shop :

Kraft Cardstock


Maja Design Vintage Frost Basics


* * * * *
Please pop on over to Cards and More Shop to see all the great products they carry.
Also, check out the Cards and More Shop blog.
It's full of fun inspirational projects! :o)

This is my last scheduled post before Christmas.
I want to wish you all a Very Merry Christmas!
Enjoy your time of celebration with family and friends! :o)

Wednesday 21 December 2016

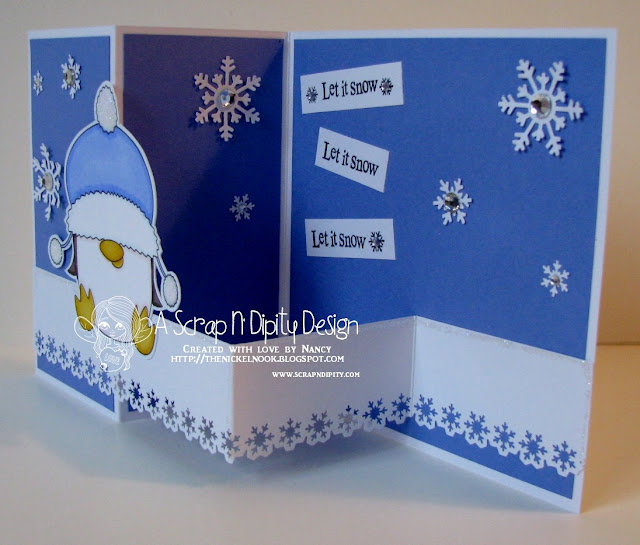
Scrap N' Dipity - Let it Snow!

Hello, my friends!

Thanks so much for stopping by today!
I have a card to share for Scrap N' Dipity.

I'm using one of the adorable penguins from the "Not-So-Helpful Xmas Penguins" image,
which you can find HERE.

After I posted this card HERE,
I was asked to do a tutorial on how I put it together.
With a new season and a new character...here we go! :o)

First, here is my finished card: 


Here is how I made it:

For the card base
Cut an 8 1/2 X 11 piece of cardstock:

5 1/2 X 11
1 1/2 X 11


Score the 5 1/2 X 11- mountain fold @ 2 3/4 
                          - valley fold @ 5 1/2

Score the 1 1/2 X 11 - mountain fold @ 5 1/2
                            - valley fold @ 8 1/4


Now cut the mats for the base:
2 @ 2 1/2 X 5 1/4
1 @ 5 1/4 X 5 1/4


Here the mats have been adhered to the base.
I added a snowflake border punch along the bottom edge of the 1 1/2" strip.


Adhere the border strip to the base where shown in photo.
Just the first 2 3/4" and the last 2 3/4".


Then all that's left is to embellish it any way you want.


I added the sweet colored penguin first!
Then I added snowflakes, and rhinestones, and a stamped sentiments! :o)


Here's the card flat and ready for an envelope:


Materials Used: 
Papers: Recollections - Cardstock;
Image: Scrap N Dipity - Not-So-Helpful Xmas Penguins;
Coloring: Spectrum Noir Markers;
Punches: Martha Stewart - Aspen Snowflake, Arctic Snowflake;
Stamp: CTMH - Snow Flurries;
Ink: Memento - Tuxedo Black;
Stickles: Star Dust.

* * * * *
Linking Up To:

(Let it Snow, Let it Snow, Let it Snow)


* * * * *

Don't forget to join our latest challenge over at the Challenge Bog.

Here are all the links you're going to need:


Sunday 18 December 2016

The Reason for the Season

Hello, my friends!

Today I  have another Christmas card to share with you!

I have paired this beautiful die from Tutti Designs
with this wonderful sentiment stamp from The Project Bin.

Don't they work together beautifully? :o)


Here's a close-up of the sentiment.
It's another one from the Luke 2 Stamp Set.


Here's a closer look at the die.
It's called Nativity Bell.


Materials Used:
Papers: Bazzill - Cardstock, MME - Naughty or Nice;
Other Die: Spellbinders Nestabilities - Curved Rectangles;
Ink: Memento - Tuxedo Black;
Bling: Crafts - Rhinestone Stickers.

 Tutti Designs Die - Nativity Bell

The Project Bin - Luke 2 Stamp Set

* * * * *
Here are all the links you need:

For The Project Bin:


For Tutti Designs:


Saturday 17 December 2016

The Project Bin - A Saviour is Born

Happy Friday, my friends!

Today I'm back with another project for The Project Bin

If you're not familiar with The Project Bin,
they specialize in wonderful sentiment stamps.
They're clear photopolymer and stamp as crisp as can be!
Each set has multiple stamps, and 
"A Way With Words."

Again, I am using the fabulous Luke 2 Stamp Set.

This is a simple card but to me it depicts the true meaning of Christmas!


I purchased this fabulous cut file as soon as I saw this beautiful Scripture stamp.


The only embellishing I did was to add gold Stickles to the star.


The font of this stamp is so lovely!
It says everything about why I celebrate Christmas! :o)


Other Materials Used:
Papers: Bazzill - Cardstock, MME - Naughty or Nice;
Cut File: Lori Whitlock - Simple Adore Him Nativity;
Ink: Staz On - Timber Brown
Stickles - Gold.


* * * * *
I'm happy to share that this card was chosen as a favorite over at Splitcoaststampers!

* * * * *
I'll be back next week to share another wonderful stamp! :o)
In the meantime...

Here are all the links you'll need:


Blog Archive