Sunday 29 January 2017

Tutti Designs - Love Heart Die

Hello, my friends!

It's Monday, and I'm back with a new Tutti Designs share!

This week I have made a very simple card using the Love Heart Die.
You can find it in the store right HERE.

I created a pink circle card base, and added a white mat.
I cut the die out of self-adhesive glitter foam.
I peeled off the backing, and placed the die onto the card.
It was a little bit tricky at this point.
The die is really intricate but the foam is quite stretchy.
I laid the die-cut down softly until I liked where it was.
Then I pressed it down into place.


Then I simply added a ribbon bow to the top of the card.


Here's a closer look at the cut.
The glitter shows it off beautifully!


Other Materials Used:
Papers: Recollections - Cardstock;
Foam: Crafts - Self-Adhesive Glitter Foam;
Ribbon: Celebrate It.

Tutti Designs Die Used - Love Heart


* * * * *
I'll be back next week with a new project.
In the meantime, here are all the links you'll need:


Thursday 26 January 2017

Cards and More Shop Blog DT - Vintage Tag

Hello, my friends! 

I'm back with a new project made with products from the Cards and More Shop .

This time I made a pretty vintage tag.
The sweet image was a recent win from Gecko Galz.
Isn't she lovely?
She worked beautifully with these pretty papers from Scrapberry's.


All the edges were tool distressed.


Just some simple layering and embellishing.


Other Materials Used:
Paper: Recollection - Cardstock;
VIntage Image: Gecko Galz; 
Punch: Martha Stewart - Branch,
WRMK - Tag Topper Punch;
My Stash: Ribbon Roses, Decorative Pin.

* * * * *
These were the products used from the Cards and More Shop :

Noor! Design - Tag No. 2


Scrapberry's - Mother's Treasure
Paper Flower

* * * * *
Please pop on over to Cards and More Shop to see all the great products they carry.
Also, check out the Cards and More Shop blog.


It's full of fun inspirational projects! :o)

Have a happy day! :o)

Wednesday 25 January 2017

The Project Bin - In My Heart Mini Album - Part 4


Happy Wednesday, my friends!

It's time for another share from The Project Bin

* * * * *
Today is the fourth and final part of my mini album 
featuring the newly released In My Heart Stamp Set.
You can find it right HERE
This fabulous set includes SEVEN stamps and TWO dies!
With all that goodness to play with, I was inspired to make a mini album.
If you missed Part 1 you can find it right HERE.
Part 2 is HERE, and Part 3 is HERE.

* * * * *
Here is the first two page spread:


The left side was covered with this fun black and white paper.
I added the black banner, and decorated it with several red punched hearts.


On this page I added a die-cut heart to the center.
I stamped and cut two of the XOXO, and added them to the page.


Here's the final two page spread:


On this page I had die-cut two of the hearts from the patterned paper. 
One of them was used on the previous spread.
I die-cut two grey hearts and adhered them into the openings.
Using a marker, I colored only the "squish you!" from the sentiment stamp, 
and stamped it onto each heart.
I thought it was cute! lol


For the final page, I again die-cut a heart from the center of the paper and adhered it to the page.
I stamped the "Happy Valentine's Day" with Versa Mark ink,
and heat embossed it with white embossing powder.
I die-cut the arrow and added it across the heart.


Finally, here is the back cover!

Other Materials Used:
Papers: Recollections - Cardstock, Fancy Pants - Love Note Paperpad;
Embossing Powder: Ranger - Detail White;
Ink: VersaMark, Memento - Tuxedo Black;
Dies: Sizzix Thinlits Die Set - Mini Album. 

The Project Bin - In My Heart Stamp Set w/ Dies


* * * * *
I really hope you've enjoyed seeing my fun mini album.
I also hope I've given you some fun ideas on the different 
ways you can play with this fabulous stamp and die set!

I'll be back next week with a new share from The Project Bin.
In the meantime...

If you're not familiar with The Project Bin,
they specialize in wonderful sentiment stamps.
They're clear photopolymer and stamp as crisp as can be!
Each set has multiple stamps, and 
"A Way With Words."

Here are all the links you'll need:


Tuesday 24 January 2017

Scrap N' Dipity - Creeper Bear

Hello, my friends!

Thanks so much for stopping by today!
I have a card to share for Scrap N' Dipity.

This time I'm using the fun "Creeper Bear" image,
which you can find HERE.
This is actually one of the freebies offered in the shop!
Isn't it fun?

Here's my card:


Materials Used:
Papers: Recollections - Cardstock, Crate Paper - Maggie Holmes;
Image: Scrap N' Dipity - Creeper Bear;
Colour: Spectrum Noir Markers;
Stamp: Stampin' Up - Itty Bitty Banners;
Ink: Memento - Tuxedo Black.

* * * * *
Don't forget to join our latest challenge...it's "Anything Goes".

Here are all the links you're going to need:


Sunday 22 January 2017

Tutti Designs - Butterfly Dance

Hello, my friends!

It's Monday, and I'm back with a new Tutti Designs share!

Today I'm sharing the gorgeous Butterfly Dance Die,
which you can find HERE.

Isn't it beautiful? 
I really love this one! :o)

I began with this pretty decorative paper.
Doesn't it suit the die perfectly?
I centered the die on the paper and ran it through my Big Shot.
Then I matted the page with brown cardstock.
  I cut the die again out of a really pretty shimmer cardstock that matched.
I adhered this piece into the space cut in the decorative paper.


Here's a closer look at the detail:


All it needed was the addition of a pretty ribbon bow!


Other Materials Used:
Papers: Recollections - Cardstock, Shimmer Cardstock
Prima - Reflections;
Ribbon: Celebrate It.

Tutti Designs Die - Butterfly Dance


* * * * *
I'll be back next week with a new project.
In the meantime, here are all the links you'll need:


Wednesday 18 January 2017

The Project Bin - In My Heart Mini Album - Part 3


Happy Wednesday, my friends!

It's time for another share from The Project Bin

* * * * *
We're now onto Part 3 part of my mini album share, 
featuring the newly released In My Heart Stamp Set.
You can find it right HERE
This fabulous set includes SEVEN stamps and TWO dies!
With all that goodness to play with, I was inspired to make a mini album.
If you missed Part 1 you can find it right HERE.
Part 2 is HERE.

* * * * *
We'll begin today with another two-page spread.
Isn't it sweet?


On this left side page I added a die-cut heart,
and strips of checked paper on the top and the bottom.
I also die-cut the XOXO in grey.
It works beautifully as just a cut without the stamping too.


On this page I just added the decorative paper because it was adorable and fit the page so well.


Here's the next spread:


On this side I added more paper strips on the top and the bottom.
I stamped the polka dot heart in VersaMark ink,
 and heat embossed it with white embossing powder.
I die-cut the heart and adhered it to the page as a pocket.
In the pocket is a ticket that has been heat embossed in white with the XOXO.


Here's another tag.
This time I randomly stamped the XOXO with VersaMark ink,
 and heat embossed it with white embossing powder.
Finally, I added some twine to the top of the tag.


Other Materials Used:
Papers: Recollections - Cardstock, Fancy Pants - Love Note Paperpad;
Embossing Powder: Ranger - Detail White;
Ink: VersaMark, Memento - Tuxedo Black;
Dies: Sizzix Thinlits Die Set - Mini Album. 

The Project Bin - In My Heart Stamp Set w/ Dies


* * * * *
I'll be back next week with the final pages of my mini album! :o)
In the meantime...

If you're not familiar with The Project Bin,
they specialize in wonderful sentiment stamps.
They're clear photopolymer and stamp as crisp as can be!
Each set has multiple stamps, and 
"A Way With Words."

Here are all the links you'll need:


Tuesday 17 January 2017

Miss Daisy Stamps DT - Gift of Love Snowman by Jennifer Nilsson Art

Hello, my friends!

I have a new card to share with you today, 
using an image from Miss Daisy Stamps.

I've used a Jennifer Nilsson Art Image called 
"Gift of Love Snowman" which you can find HERE.
Jennifer Nilsson Art Images are all available exclusively at Miss Daisy Stamps!


Materials Used:
Papers: Recollections - Cardstock, Basic Grey - Eskimo Kisses;
Image: Jennifer Nilsson Art at Miss Daisy Stamps - Gift of Love Snowman;
Coloring: Spectrum Noir Markers;
Punch: Martha Stewart - Aspen Snowflake Corner Punch;
Bling: Kaisercraft Rhinestones;
Sequins: Dollarama - Pink.

* * * * *

Here are all the links:


Kathryne is very generous with gifts and surprises.

You'll want to sign up so you don't miss any of the fun!

Sunday 15 January 2017

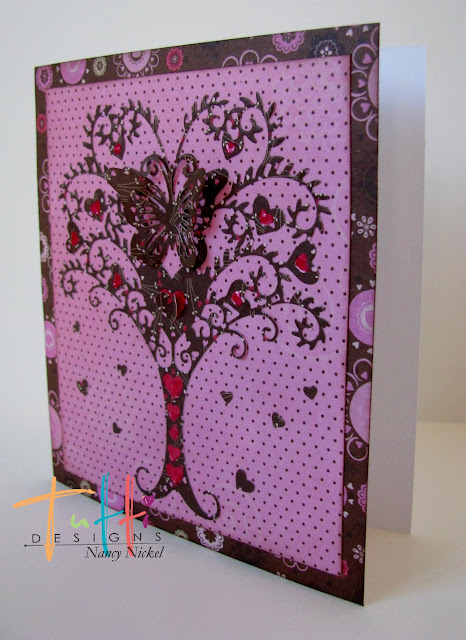
Tutti Designs - Whimsical Love Tree

Hello, my friends!

It's Monday, and I'm back with a new Tutti Designs share!

Today I am featuring the lovely Whimsical Love Tree Die,
which you can find HERE.

This is another die that is lots of fun to play with.
I started with my polka dot background, and matted it with a coordinating paper.
Then I chose another coordinating paper, with a smaller scale, to cut the die.
I adhered the die to the polka dot paper,
and filled a number of the open hearts with red Liquid Pearls.
It adds such a pretty shimmer, and makes the hearts stand out.


I fussy cut the focal butterfly from a second cut of the die,
and popped it up to add some dimension.
I also popped up a folded heart on top of the Liquid Pearl heart beneath the butterfly.


Finally, I scattered the little die-cut hearts around the page.


Obviously, this die is great for Valentine's Day.
However, with a few changes, I can see it working for baby cards, birthday cards, and lovely Spring cards too!


Other Materials Used:
Papers: Bo Bunny - Crazy Love;
Liquid Pearls - Rouge.

Tutti Designs Die - Whimsical Love Tree


* * * * *
I'll be back next week with a new project.
In the meantime, here are all the links you'll need:


Blog Archive