Friday 30 June 2017

Vera Lane Studio - New Release and Final Guest DT Project

Hello, my friends!

I'm back today with my final Guest DT post for Vera Lane Studios!

I want to thank Janet for inviting me to join the fun for June!
It's been so great to be a part of it all!
A big thanks to the entire Design Team too!
They were so welcoming and generous with their sweet comments.
THANK YOU!! :o)
I'm totally hooked on these fun images, 
so I will continue to share more projects using them. 


* * * * * 
This week I'm sharing a project using the New Release Image Set:

Seahorse and Octopus

It is a set that works perfectly with last week's New Release:

The Mermaid

I have actually used a couple of bits from The Mermaid on today's project, as well.

I have created another art journal page for you today!
I printed and cut everything with my Cricut Explore Air.
I colored all the pieces with Spectrum Noir Markers.
I inked the pages of my journal, and adhered all the bits in place.
It was so fun to play with the placement! :o)


Here's the left-hand side. 
This is a very special octopus that releases ink out of his head! ;o)
Isn't he cute?


Here's a closer look at the detail of the bottom of the page:


Here's the right-hand side with the sweet sentiment,
and the cute seahorse.


The detail on the bottom of the page:


Other Materials Used:
Machine: Cricut Explore Air;
 Color: Spectrum Noir Markers,
Faber-Castell PITT Pens - Brown, Green Blue;
Distress Inks: Salty Ocean, Evergreen Bough, Peacock Feathers,
Walnut Stain, Vintage Photo;
Stickles: Star Dust;
Dylusions Art Journal.

Vera Lane Studio:


* * * * *
Isn't that a fun new set?
That's it for my Guest DT posts for Vera Lane Studio!
Thanks so much for following my journey! :o)

* * * * *
Here are all the links you need:


on facebook
This group is so warm and friendly!
It's a wonderful place to be inspired! :o)

Wednesday 28 June 2017

Miss Daisy Stamps - Flower Pot Bunny

Hello, my friends!

I have a new card to share with you today, 
using an image from Miss Daisy Stamps.
This one is called "Flower Pot Bunny" and you can find it HERE.

This looks like an Easter card, doesn't it?
It's actually my summer card!
I've been in the bunny mood lately. 
 I've been having lots of fun watching the rabbits in our yard. 


Isn't this image cute?
I colored it with my markers, and then added some Stickles.


Some fun layering, and a pretty sparkly bow!


Other Materials Used:
Papers: Graphic 45 - Secret Garden Patterns & Solids;
Color: Spectrum Noir Markers;
Die: WRMK - Nesting Circles, 
Spellbinders Nestabilities - Big Scalloped Circles SM;
Ribbon: Celebrate It;
Stickles: Star Dust.

Monday 26 June 2017

Happy News For My Canadian Friends! Perhaps It Will Interest Everyone Else Too!

Hello, my friends!

Happy Monday to you all! :o)

As the title says...this is happy news for my Canadian friends!
However, parts of it apply to everyone else too! 
You can even skip to the bottom if you'd like,
to read the parts that apply to you! ;o)

* * * * *

Did you know that on July 1st Canada is celebrating it's 150th Birthday? 
I know that we're still relatively young compared to many countries. 
We don't look a day over 149! lol
Anyways...the whole country is celebrating in lots of fun ways!

Shawn...over at Magnolia-licious is sharing his celebration with all of us.
This is what he has posted at his blog:


Money at Par to Celebrate Canada's 150th Birthday!!


Magnolia-licious Store is delighted and thrilled to celebrate Canada's 150th Birthday
 by offering all orders made from June 30th - July 3rd, 2017 to all Canadians


This will work by everyone selecting cheque/money order option when placing their order. 
I will then convert the US invoice over to Canadian Dollars, 
then personally send each individual a PayPal invoice reflecting the changes in price.  


I will be using Google Currency to convert US funds to Canadian funds.  


***This offer does not apply to any DooHickey Kits or Vintage Boxes***

***Any items that are ordered as Pre-orders can take up to 4 weeks to be delivered as they can come from as far as Europe***

I hope you can take advantage of this opportunity and I wish everyone a Happy Canada Day.

Cheers, Shawn

* * * * *
Isn't that great? So generous of Shawn!
Just a little tip for those of you interested.
Head over to the shop now, and create an account. 
Then you can do your browsing and shopping ahead of time, 
and just save it in your cart. 
Then when the sale starts you're all ready to check out! :o)

* * * * *
This is the news that applies to EVERYONE!!

Hmmm...I guess maybe this doesn't apply to everyone after all!
It's more for all of you that are in North America.
(Sorry Annabel! lol)
I know that you've all seen and heard the buzz about Foamiran!
Well, Magnolia-licious is now carrying Foamiran!
That is very exciting news, right? 
In the shop right now you will find a great selection of the foam,
as well as the Rosy Owl Dies.
There is loads more Foamiran product coming though,
including all the gorgeous stamen! 

So...all you need are the links:


(Here you'll find shop news, inspiration, 
and a monthly challenge with a great prize!)


Sunday 25 June 2017

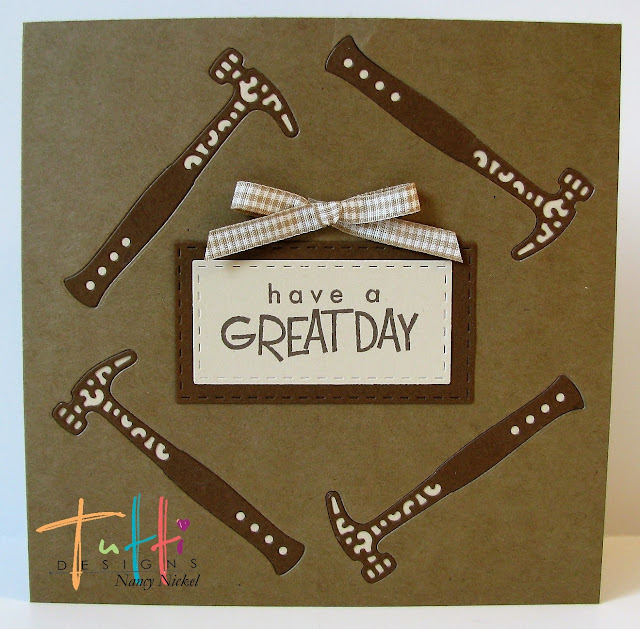
Tutti Designs - If I had a Hammer...

Hello, my friends!

It's Monday, and I'm back with a new Tutti Designs share!

It's another masculine card.
This time I've used the Fancy Hammer Die.
You can find it HERE.

Here's my card:


I began by creating a 5 1/2" square card base in kraft cardstock.
I cut the Fancy Hammer out of the card front four times.
Then I cut four more Fancy Hammers out of dark brown cardstock.
I adhered a 5 1/4" cream cardstock piece to the back side of the card front.
Then I simply adhered the dark brown Fancy Hammer cuts into the hammer openings.


I stamped the sentiment on the smallest of the Stitched Nesting Rectangles in cream.
I then matted it with the next size in dark brown.
Finally, I added a small tan checked bow above the sentiment.


Here's a closer look at the Fancy Hammer:


Here's one final look at the card. 
It's a great masculine card for any occasion.
Try it for yourself...have some fun with the hammer placement! 


Other Materials Used:
Papers: Recollections - Cardstock;
Ink: Memento - Rick Cocoa;
Stamp: Hero Arts - CL351 Sentiment;
Ribbon: Unknown.

Tutti Designs Dies Used:

Fancy Hammer Die


Stitched Nesting Rectangles


* * * * *
I'll be back next week with a new project.
In the meantime, here are all the links you'll need:


Vera Lane Studio - New Release Fun with The Mermaid

Hello, my friends!

I'm back today with another Guest post for Vera Lane Studios!


I've been a long time fan of these wonderful digi images,
so I'm really thrilled to be sharing weekly posts for the month of June. 

* * * * * 
This week I'm sharing a project using the New Release Image Set:
The Mermaid

I created a little piece to hang on the wall.
I was very happy that Janet had the option to add the top to the mermaid,
for those of us that are more modest! ;o)
Here's what I made:


I sized the images, printed them, and cut them with my Cricut Explore Air.
I colored them with Spectrum Noir markers. 
I created the background with distress inks on Bristol paper.
Big water drops were added, along with a few splashes.
I then mounted that onto cardstock that had been adhered to chipboard. 


Then I put my scene together.
I used foam tape on some pieces, and curled up other bits,
to add dimension.


I added Stickles for some sparkle,
and some Perfect Pearls for the pearl in her hand.


Then I added sequins for some more sparkle.


Then I found this ribbon in my stash. 
It seemed rather seaweedish to me.
I braided it together and added a strip to the top and the bottom.


Other Materials Used:
Papers: Bristol Paper, Recollections - Cardstock;
Color: Spectrum Noir Markers;
Distress Inks: Salty Ocean, Evergreen Bough, Peacock Feathers;
Stickles: Star Dust;
Perfect Pearls: White Pearls;
Dies: Spellbinders Shapeabilities - Nautical Frame and Accents;
Sequins: Dollarama.

Vera Lane Studio:


* * * * *
Isn't that a fun set?
I'll be back on Friday with my final Guest DT share!
See you then! :o)

* * * * *
Here are all the links you need:


on facebook
This group is so warm and friendly!
It's a wonderful place to be inspired! :o)

Mustard Seed Faith Challenge

Sunday Blessings to you, my friends!

It's time for a new challenge over at Mustard Seed Faith Challenge Blog

It's my turn to share a few thoughts with you.
I’m going to begin by asking you a question:

What does JOY mean to you?

Think about that for a minute while I share today’s Scripture verse:

“Consider it pure JOY, my brothers and sisters,
whenever you face trials of many kinds…”
James 1:2 NIV

Now let’s go back to the question.
If we think of it in the context of that verse, our meaning of JOY is wrong.
We usually think of JOY as being feelings of happiness, right?
We don’t feel happy when we’re facing trials, do we?
No!
Well…JOY does mean feelings of happiness and great pleasure
but did you know that JOY is also a verb?
A verb is an action word, right?
It’s something that we DO.
So…how do we DO JOY?
We CHOOSE it! We GO AFTER it! We BE it!
HOW do we do that?
When we’re in the midst of pain and stress and misery…how do we do that?
We focus on our HOPE and FAITH, and the inner JOY we all have,
…a gift given to us from the Lord.
True lasting JOY, and the peace that comes with it, comes from the Lord!

Those of you that have been visiting my blog for some time
know that JOY is a recurring theme with me here.

As someone who has lived with almost constant pain for many years,
I can tell you that the decision to "CHOOSE JOY"
has made a huge difference in my own life.
As it says in Nehemiah 8:10:

The JOY of the Lord is my strength! 

Don't get me wrong...it's not always an easy thing.
In fact...some days it seems downright impossible! lol
However, that's when I hand it all over to God...and the JOY comes!  :o)

*****
That brings me to the Challenge today!
Pull out some goodies from your stash that bring you JOY!
Then JOYFULLY create a project to share with us here!

I look forward to seeing what you make! :o)

* * * * * 
I made a fun 6 X 6 canvas to hang as a reminder to myself.
It's all in pretty pink!
(Sorry, Annabel, no mustard this time!)
I cut the paper to fit, and then stenciled the design. 
I distressed the edges and adhered it to the canvas front.
Then I inked around the front edge.
I cut the letters out with my Cricut, inked them, and adhered them in place.
I added sequins for some sparkle.


I inked some wide white lace with the matching pink ink,
and wrapped it around the edge of the canvas.
I created a triple bow from the glittery ribbon and added it to the top.


Finally, I added some Stickles to the letters.


Materials Used:
Papers: Crate Paper - Ransom;
Ink: Martha Stewart - Pink Geranium, 
Distress Ink - Walnut Stain;
Stencil: TCW - Mini Curl Frame;
Cricut Cartridge: Plantin SchoolBook;
Stickles: Cotton Candy;
Ribbon: Celebrate It;
Lace: My Stash;
Sequins: Dollarama.

* * * * * 
So head on over to the

There you can meet the rest of the Design Team
and see what they've created for the challenge this week. 

Then check out the simple rules, make something,
and link it up!

I can't wait to see what you make! :o)

Thursday 22 June 2017

Cards and More Shop Blog - Butterfly Card

Hello, my friends! 

I'm back with a new project made with products from the Cards and More Shop .

You may have seen the announcement yesterday...
...I am continuing with the Design Team! 

Here is a card that was fun to put together. 


The image was a win that I received from Gecko Galz.
It was the inspiration for the design. 
I distressed the edges and matted it on the teal cardstock.
Then I added a layer of the lovely Scrapberry paper.


The final background layer was stenciled using the 
fabulous Dutch Doobadoo Butterfly Mask.
The white chalk ink shows up so softly against the teal cardstock.


Isn't it a pretty card?
Lovely for any occasion! 


These were the products used from the Cards and More Shop :

 Dutch Doobadoo Mask Art A6 Butterfly


Tim Holtz Paper Distresser


* * * * *
Please pop on over to Cards and More Shop to see all the great products they carry.

There are lots of fun inspirational projects!  

Have a happy day! :o)

Blog Archive